Howdy Pardners

Well, (such a deep subject for such a shallow mind) my blog experience is closing in on 6-8 months now. The winter here in New Mexico has been cold so I have not been able to work in my unheated upholstery shop. The weather is turning and warming up so I may be able to get back to submitting upholstery how-to's and projects soon. As you can read I am still going to the Universtiy of Phoenix and selling in my eBay store. Both experiences have had there challanges. I appreciate all of those (world wide) that take the time and find a tidbit of interest in my bantering. You all take care........Duane

Friday, October 8, 2010

How To Make A Cushion For A Vintage Camel Saddle Footstool


I have had success in finding these vintage camel saddle footstools, restoring them and then selling them in


I found this footstool at a local (Albuquerque) antique mall that I frequent. In my younger years I used to hang out in bars but now I hang out in antique stores. It must be because I am one (an antique) I guess. But I digress. This camel saddle footstool needs some TLC but the price was right and the basics were all there and it has some neat details.


The horns are covered in an embossed leather. It is hard to tell in the picture but it is an Arabic scene with a camel and all.


The legs have some great detail. The shape is unusual and the decorative nail head star burst design add a great touch. The stamped brass caps on the end of the legs are really cool.

Stamped in to the cushion frame is "Made in Morocco" which will be a great feature when I go to list it.


On the other side of the cushion frame is stamped some Arabic script followed by "Sahara" which lends a nice touch. I am guessing that this camel saddle footstool is from the 1960's. The footstool has a lot of potential but it needs a lot of work. The first thing that I am going to do is make the seat cushion. So let's get started.


I had some heavy paper laying around and of course my chalk which is what I will use to make my template for the cushion.


I cut a piece of paper that is oversize and lay it on the frameof the stool. The seat frame is not flat so I form the paper to the frame. I cut around the horns of the stool just enough for the paper to lay flat. I find the edge of the frame with my thumb and forefinger and at the same time tracing the outline of the frame. I want to make sure that the paper does not slip while I am marking the pattern. When I am satisfied with the pattern I cut it out. As shown in the photo I don't want to cut on the line but cut about 1/2 inch outside of the line. This will allow for the seam when I sew the cushion together.


When I cut my pattern I only cut half way, fold my pattern to match up with the other side, I make sure that I allow for the 1/2 inch, and then cut out the other side of the pattern. This will make sure that my pattern is symmetrical and the cushion should fit on the stool and look even on all sides. I finish cutting my pattern and lay it on the stool to check for fit. If the pattern does not look right keep in mind that you cut it out of paper and you can always make another one. You're better off throwing away paper than leather.


I had a piece of maroon leather which I am going to use as my cushion. The camel saddle footstool originally had a leather seat cushion but I could have used a nice vinyl or a fabric. I don't have a very big piece of leather so I have to be judicial in how I lay my pattern out to get maximum advantage of my leather. Keep in mind I have to cut out a bottom piece and the boxing (the edge) to complete the cushion.


Looking Good. The line on the leather, in the photo is a chalk line which I will clean off when finished.


For the bottom pattern I take my paper pattern, find the center and cut the pattern in two. The reason for this is that the bottom is where you insert the padding and I am going to have to have an opening to do that.


Once I have cut my pattern I again lay it on my leather to get maximum use of the leather. Notice the dotted chalk line on the the one side. I am going to sew these two pieces together and I have to allow that 1/2 inch for the seam. I have already allowed the seam allowance on the rest of the pattern. I cut this piece out and then flip either the pattern or the piece that you have cut out to cut out the opposite side.


When I have my two bottom pieces cut out I lay them face to face to get ready to sew them together. I cut out two small leather squares which I will use as reinforcement at the end of my seam. I am only going to sew down each end a couple of inches because I have an opening to be able to stuff the cushion. The reinforcement will help so the seam doesn't rip when I am stuffing in the padding


I have a commercial sewing machine that handles this job with ease. Some home machines will do a sufficient job also. If you don't have access to a sewing machine you may consider taking you pattern pieces to an upholstery shop and paying them to sew the patterns together.


My next step is to cut out the boxing or the edge of the cushion. I try to find the longest point on my leather but even at that I am going to have to sew pieces together to make them long enough to go around the the pattern. I try to make my seams land in the same place on both sides of the cushion and in a spot that is the least conspicuous. In this case I am going to place a seam on each end of the cushion.


To avoid to much thickness at the seams I lay both sides of the seam down flat and sew over them. I also don't want a seam at a corner because it will add thickness and make going around the corner difficult.


I continue to sew my boxing onto the top pattern piece. When I am completed I snip inside the seam particularly on the corners and inside where it goes around the horn. This will let the seam lay flatter. Make sure you don't cut the thread or past the seam.

This next step is something that you don't have to do to complete the cushion. I like to add some leather cross stitch detail along the top seam. Just because I like to. It adds nothing but a little extra touch to the cushion. The tools and materials that I need is a spool of leather lacing. I am using black because I had it laying around. The lacing can be purchased at most larger hobby stores or through a Tandy Leather store. A leather punch and the little brass dohicky is the needle to lace the leather with. This special needle is blunt on the one end and is hollow and threaded on the other end. You should be able to purchase on of these at the same place that you find the lacing.


As shown I cut the leather lacing at an angle and then thread it into the brass needle twisting the needle over the lacing. The threads will hold the leather in place while lacing through the leather.


I then mark the leather with my chalk in 1 inch increments all along the perimeter of the seam.


I take my leather punch and set the punch wheel on the smallest punch available. You don't want the hole so big that the padding will show when the lacing is inserted. I punch through both the cushion edging and the top pattern at the same time. I punch the holes about 1/4 inch or so above the above the seam. One little hint. I had to piece my boxing together so even if one of my one inch marks ends up on that seam I don't want to punch through the thread because it will open the seam. Even if my measurement is a little off (who cares it's supposed to look rustic) I will punch my hole on one side of the other of the seam.


I have all of my holes punched.
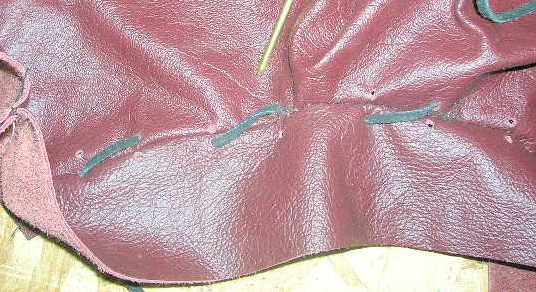

I then start to lace the cushion. I cut off 3 to 4 times the length of the perimeter of the frame and tie a knot on the end of the lacing. If you come up short just tie the pieces together and hide the knot underneath. I started in the middle of the horn notch. I came up through the first hole to the end of the lacing. I then went over the top of the seam to the next adjacent hole. I keep doing this all along the perimeter of the cushion until I come back where I started. I don't want to pull the lacing so tight that it bunches the leather but not to loose. I also try not to let the lacing twist. So all along I am adjusting my lacing. When I am through with this part I repeat the whole process again until I have a cross stitch all along the perimeter of the cushion.

Pretty cool huh?

The underside view.

I then take my bottom pattern and mark at one inch intervals and punch holes about 1/2 inch from the edge. I will not lace this yet but will wait until I have the cushion sewn together and stuffed.


Now it is time to sew the top and bottom pieces together. The one critical area to watch is to make sure that the corners of the cushion match up.

I find the right placement and start sewing a couple of inches in front of the first corner. Once I get around the first corner and have sewn three or four inches past the corner I find the next corner and hold it in place with my left hand between thumb and forefinger. If it appears that things are not going to match up then something is wrong and you need to check the first corner. I keep repeating this process until I have completely sewn around the perimeter of the cushion. It is now time to "stuff"it.


I use a cotton batting to stuff these cushions which was what the original cushion had. Polyester or poly urethane won't work. The only other padding that would work with this type of cushion would be a down fill and that is a whole different ball game. You may have to contact an upholster that specializes in restoring antique furniture and see if they will sell you some. You can get by with his scraps if he has any. I never throw any of mine away.


Start by taking wads of the cotton and shoving it into the corners of the cushions. Keep doing this and make sure that you pack it in there and try not to have to many lumps showing up top. Keep filling the cushion up with the cotton. You will be surprised with how much it will take.


When I have filled the cushion I then lace up the bottom.


There you have it. One thing about the cotton batting is that it is fluffy so even if you pack it in tight there is still air in the cotton. I took this cushion and filled it the best I could, laced it up and put a bunch of books on top of it to compact the cotton down. I wll then go back and unlace the bottom and insert more cotton. I may end up doing this a couple of times before I am done.

Well I have the cushion finished but the frame has some issues that I will take you through in the next post. If you have any questions please don't hesitate to ask. If you are working on a different project and you have a question I will do the best I can to answer it.
Until then "happy trails"..........Duane

Wednesday, October 6, 2010

eBay Shipping Tips & Keeping Your DSR's High

Hello All. As many of you may have guessed, by now, that I have an  eBay store. I sell books, antiques, collectibles and drop ship home decor items and electronic merchandise. You can find my store AnuDirection by clicking on the link provided. I have been working on this store for nearly five years and have as of October 2, 2010  ( Feedback Score Of 2447Red star icon for feedback score in between 1,000 to 4,999) Get fast shipping and excellent service from Top-rated sellers. Member is a PowerSeller About member eBay Store with a 100% positive feedback score. Now as many of you know there are many sellers that are considered large sellers and there are many, like me, that are small sellers. According to eBay "top rated sellers" are the top 10% of sellers on eBay.

In order for a seller, on eBay, to maintain high DSR's there are four categories that they must receive high feedback scores on. They are communications. item description, shipping time and shipping cost. You can see that shipping weighs heavily on the sellers DSR's scores. Through trial and error, after five years, I have developed a system that works for me and the products that I sell. Other sellers may have their own system that works for them but this blog is about me, me, me.

In order to maintain high scores on shipping you must have a means to have accurate weights on the packages you ship and list. This is one area where you can "lose your shirt" if you list something and the shipping fees are not accurate. If you are to low with your estimate it will cost you money. If you are to high and the shipping costs seem extravagant for the buyer you may lose a sell or get low feedback scores on shipping costs. In a lot of ways with shipping the seller is between a rock and a hard place. It doesn't seem to matter what shipping method you use it is costly. I find it curious that a person will spend $4.50 for a latte but have a fit spending $4.50 to ship an item across the United States. Go figure.

For a seller, on eBay, or any other business that you ship items you need the proper tools and supplies. One of the first tools I purchased, when I started selling on eBay, was a small USPS postal scale.


This scale wasn't to expensive, is digital and is accurate up to 10 pounds. I still use the same scale today. It certainly has paid for itself over the years. I use this scale to weigh books and small light items. There are some items I sell that are weigh over ten pounds. Believe it or not when I first started selling I weighed heavy items on a bathroom scale. Talk about "trial and error". I learned very quickly (remember the losing your shirt comment) that I needed to invest in a scale that weighed accurately over ten pounds.


This scale weighs items up to 300 pounds. This scale has also paid for itself over the years. What is convenient about this scale is not only will it weigh heavy items but the digital monitor is attached with a coiled cord so if you have a very large package you can still read the information.


Most customers, mine included, expect their purchase to arrive intact, unharmed and in the same condition that was described in the listing (customers expect a lot huh?). I use a quality 2 inch packing tape, bio-degradable packing filler and bubble wrap to insure my items arrive to my customers safely. As an eBay seller you are responsible for the item until it is received. When you have a transaction, have taken the time, expense and trouble of packing the item and get a message from your customer that the item is damaged it just kinda ruins your day. But you know "stuff happens" and that is just part of having an Internet business. That is why I don't skimp on packing material. Like my old friend Kossee used to say "you lose twice, with a refund, it is the money that you didn't have and the money that you had to give back".

I have found for me that USPS (grumble grumble humph) is the most reliable, convenient and cost effective way to ship my items. I know there are other sources but remember this blog is about me me me. I do use UPS for larger items (like one of my antique chairs) and the items that I drop ship are shipped through UPS. So I have nothing in particular against UPS it's just that I ship about 98% of my items through USPS.

Here is what I have learned from dealing with USPS over the last five years. It makes you wonder why they have lost 6 billion dollars last year. In order to keep my shipping costs as low as possible and to keep my customers happy (remember shipping DSR's) there are certain techniques that I use to ship my items.

Let's start with the books I sell first.


11 1/2" x 14 1/2 " Manila Envelope

Most of my books I send "media mail" which has its restrictions but most book buyers understand that. Media mail is slow and USPS can, at their choosing, open the package to inspect without your approval. The post office wants to make sure that you are not mailing something that media mail does not allow. Most books can be sent, within the United States, media mail for under $4.00. If the book or publication is under 13 ounces, it can be sent first class mail, it is about the same cost as media mail but it arrives to my customer much quicker and that is usually worth the few cents that there may be in the difference in price (remember customers that receive their item quickly are happy customers that give you high feedback scores). I wrap the book carefully, with bubble wrap, and if the envelope is to large for the contents I will cut some of the excess off. I weigh the book, print my shipping label, insert the packing slip and tape the label to the outside. In most cases, but not all, I list my books "free shipping". Through experience I have a pretty good idea how much the book is going to cost to ship media mail. I determine a price and figure the cost of shipping into it. That way every customer pays the same flat rate. With eBay's system sellers who offer "free shipping" get a higher search rating than those that don't. This also helps with keeping my DSR's at a high level.


USPS Priority Mail Flat Rate Envelope

When I sell a more expensive book, say $20.00 and up, I want my customer to receive their book fast. "If it fits it ships" and I will use a flat rate envelope to ship the book. I may have saved a $1.00 or so by shipping the book media mail but I accomplish a couple of things by using this method that help to keep my DSR's high. First my customer knows that I appreciate their business and want to create a long term relationship with them by spending the extra money to get the product to them quickly. The USPS flat rate envelope will ship from Albuquerque and will get across the United States in two to three days. I have some customers in Texas that will get their purchase the next business day. My customers that receive their purchase quickly generally state their appreciation with very high feedback scores. Those high feedback scores will encourage new buyers to buy from me and isn't that the name of the game.

Because I print my own labels it costs me $4.75 to ship via a flat rate envelope. The envelopes are free from the post office. I generally order a case of them at a time from USPS and they are shipped directly to my address. Ya really can't beat that deal.

I invite you to read some feedback from happy customers that have been posted recently.


Top Rated Seller Icon
 When you are a seller on eBay this is the icon that you work hard to get. This icon identifies me as being consistent in delivering the goods and service that I promise. Like I stated above only the top 10% of eBay sellers are identified as Top Rated Sellers. When you are identified as a top rated seller you will enjoy better search placement, the icon will appear with all of your listings and there are some fee discounts associated with being a top rated seller. It is worth it to receive this seller status and I work very hard to maintain it.


Large Flat Rate Priority Box


Medium Flat Rate Priority Box

I use the medium flat rate postal box and the large flat rate box as a means of shipping some of my products swiftly, securely and I think at a reasonable cost. When I purchase shipping labels from the Internet the medium box costs $10.20 to ship anywhere in the United States and it will arrive in two to three business days. This box measures 11 1/2 x 13 x 2 1/2 inches. Like the flat rate envelope I can order these from USPS at no charge and they will deliver them to my door. The large flat rate priority box measures 12 x 12 x 5 1/2 inches and an Internet shipping label costs $13.40. Both these boxes and the flat rate envelope can also be used for international shipping, USPS also offers a couple of other size priority boxes which I very seldom if at all use.

When I am looking to buy antiques and collectibles I always try to purchase items that can be shipped via one of the methods that I have described. For items that won't fit into one of these envelopes or boxes I resort to parcel post. Parcel post is, in my opinion, very expensive and probably comparable to sending something through UPS but it takes longer. Then there is the additional hassle of trying to locate the appropriate cardboard box.

I do also drop ship home decor items where my drop shipper uses UPS as a shipping service. Of course the drop shipper is a huge shipper and more than likely gets select service and best price from UPS. I will use UPS for very large items, like the antique furniture that I sell, that USPS can not accommodate.

Well I hope that you were able to get some tidbit of information from all of this. Thank you for reading this post. If you have any questions I would be more than happy to try and answer them. If you have any suggestions or comments I would like to hear from you.

Until then "happy trails"...........Duane