
I have had success in finding these vintage camel saddle footstools, restoring them and then selling them in

I found this footstool at a local (Albuquerque) antique mall that I frequent. In my younger years I used to hang out in bars but now I hang out in antique stores. It must be because I am one (an antique) I guess. But I digress. This camel saddle footstool needs some TLC but the price was right and the basics were all there and it has some neat details.

The horns are covered in an embossed leather. It is hard to tell in the picture but it is an Arabic scene with a camel and all.

The legs have some great detail. The shape is unusual and the decorative nail head star burst design add a great touch. The stamped brass caps on the end of the legs are really cool.


I had some heavy paper laying around and of course my chalk which is what I will use to make my template for the cushion.


I cut a piece of paper that is oversize and lay it on the frameof the stool. The seat frame is not flat so I form the paper to the frame. I cut around the horns of the stool just enough for the paper to lay flat. I find the edge of the frame with my thumb and forefinger and at the same time tracing the outline of the frame. I want to make sure that the paper does not slip while I am marking the pattern. When I am satisfied with the pattern I cut it out. As shown in the photo I don't want to cut on the line but cut about 1/2 inch outside of the line. This will allow for the seam when I sew the cushion together.


When I cut my pattern I only cut half way, fold my pattern to match up with the other side, I make sure that I allow for the 1/2 inch, and then cut out the other side of the pattern. This will make sure that my pattern is symmetrical and the cushion should fit on the stool and look even on all sides. I finish cutting my pattern and lay it on the stool to check for fit. If the pattern does not look right keep in mind that you cut it out of paper and you can always make another one. You're better off throwing away paper than leather.

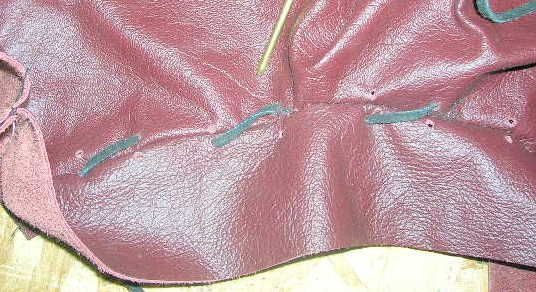
I had a piece of maroon leather which I am going to use as my cushion. The camel saddle footstool originally had a leather seat cushion but I could have used a nice vinyl or a fabric. I don't have a very big piece of leather so I have to be judicial in how I lay my pattern out to get maximum advantage of my leather. Keep in mind I have to cut out a bottom piece and the boxing (the edge) to complete the cushion.

Looking Good. The line on the leather, in the photo is a chalk line which I will clean off when finished.

For the bottom pattern I take my paper pattern, find the center and cut the pattern in two. The reason for this is that the bottom is where you insert the padding and I am going to have to have an opening to do that.

Once I have cut my pattern I again lay it on my leather to get maximum use of the leather. Notice the dotted chalk line on the the one side. I am going to sew these two pieces together and I have to allow that 1/2 inch for the seam. I have already allowed the seam allowance on the rest of the pattern. I cut this piece out and then flip either the pattern or the piece that you have cut out to cut out the opposite side.


When I have my two bottom pieces cut out I lay them face to face to get ready to sew them together. I cut out two small leather squares which I will use as reinforcement at the end of my seam. I am only going to sew down each end a couple of inches because I have an opening to be able to stuff the cushion. The reinforcement will help so the seam doesn't rip when I am stuffing in the padding

I have a commercial sewing machine that handles this job with ease. Some home machines will do a sufficient job also. If you don't have access to a sewing machine you may consider taking you pattern pieces to an upholstery shop and paying them to sew the patterns together.

My next step is to cut out the boxing or the edge of the cushion. I try to find the longest point on my leather but even at that I am going to have to sew pieces together to make them long enough to go around the the pattern. I try to make my seams land in the same place on both sides of the cushion and in a spot that is the least conspicuous. In this case I am going to place a seam on each end of the cushion.

To avoid to much thickness at the seams I lay both sides of the seam down flat and sew over them. I also don't want a seam at a corner because it will add thickness and make going around the corner difficult.

I continue to sew my boxing onto the top pattern piece. When I am completed I snip inside the seam particularly on the corners and inside where it goes around the horn. This will let the seam lay flatter. Make sure you don't cut the thread or past the seam.


As shown I cut the leather lacing at an angle and then thread it into the brass needle twisting the needle over the lacing. The threads will hold the leather in place while lacing through the leather.

I then mark the leather with my chalk in 1 inch increments all along the perimeter of the seam.

I take my leather punch and set the punch wheel on the smallest punch available. You don't want the hole so big that the padding will show when the lacing is inserted. I punch through both the cushion edging and the top pattern at the same time. I punch the holes about 1/4 inch or so above the above the seam. One little hint. I had to piece my boxing together so even if one of my one inch marks ends up on that seam I don't want to punch through the thread because it will open the seam. Even if my measurement is a little off (who cares it's supposed to look rustic) I will punch my hole on one side of the other of the seam.

I have all of my holes punched.
I then start to lace the cushion. I cut off 3 to 4 times the length of the perimeter of the frame and tie a knot on the end of the lacing. If you come up short just tie the pieces together and hide the knot underneath. I started in the middle of the horn notch. I came up through the first hole to the end of the lacing. I then went over the top of the seam to the next adjacent hole. I keep doing this all along the perimeter of the cushion until I come back where I started. I don't want to pull the lacing so tight that it bunches the leather but not to loose. I also try not to let the lacing twist. So all along I am adjusting my lacing. When I am through with this part I repeat the whole process again until I have a cross stitch all along the perimeter of the cushion.


Now it is time to sew the top and bottom pieces together. The one critical area to watch is to make sure that the corners of the cushion match up.

I find the right placement and start sewing a couple of inches in front of the first corner. Once I get around the first corner and have sewn three or four inches past the corner I find the next corner and hold it in place with my left hand between thumb and forefinger. If it appears that things are not going to match up then something is wrong and you need to check the first corner. I keep repeating this process until I have completely sewn around the perimeter of the cushion. It is now time to "stuff"it.


I use a cotton batting to stuff these cushions which was what the original cushion had. Polyester or poly urethane won't work. The only other padding that would work with this type of cushion would be a down fill and that is a whole different ball game. You may have to contact an upholster that specializes in restoring antique furniture and see if they will sell you some. You can get by with his scraps if he has any. I never throw any of mine away.


Start by taking wads of the cotton and shoving it into the corners of the cushions. Keep doing this and make sure that you pack it in there and try not to have to many lumps showing up top. Keep filling the cushion up with the cotton. You will be surprised with how much it will take.

When I have filled the cushion I then lace up the bottom.

There you have it. One thing about the cotton batting is that it is fluffy so even if you pack it in tight there is still air in the cotton. I took this cushion and filled it the best I could, laced it up and put a bunch of books on top of it to compact the cotton down. I wll then go back and unlace the bottom and insert more cotton. I may end up doing this a couple of times before I am done.
Well I have the cushion finished but the frame has some issues that I will take you through in the next post. If you have any questions please don't hesitate to ask. If you are working on a different project and you have a question I will do the best I can to answer it.
Until then "happy trails"..........Duane
This comment has been removed by the author.
ReplyDeleteduanne! are you still out there? i need your help on a camel stool cushion. please reply to natworah@gmail.com. hope your still kickin and pickin!
ReplyDeletepeace-holly
Hi I just bought this EXACT stool at Goodwill and was wondering what you sold it for? I would SO appreciate it! thanks
ReplyDeleteTrysh
Hi there. My mother inherited a vintage Egyptian camel saddle seat from her parents. We are in the process of restoring it for her birthday but have become stuck on how to do the ties, or lashings, around the wood. Would you have any advice on how we do that? Are you able to blog it or email me? Or do you know of a site or place I can contact who can help? Thank you so much for any advice you can give in advance!
ReplyDeleteI also meant to say that it is very similar to yours above!
DeleteThis is purely a Art.... Impressive...
ReplyDeleteReenoy
University Classroom
Is there a technical reason why polyester batting won't work for stuffing the cushion?
ReplyDeleteThank you for this easy to follow lesson on making a camel stool cushion. Right now I'm still hoping to luck into a green leather one -- but may well have to make my own. Thanks again for your help.
ReplyDeleteThank you for this easy to follow lesson on making a camel stool cushion. Right now I'm still hoping to luck into a green leather one -- but may well have to make my own. Thanks again for your help.
ReplyDelete